
In the previous post, I did show you how to create LAMPP Desktop Icon on Linux. In this post, I will show you step-by-step how to install it and how to configure it for more convenience.
Overview
Install LAMPP on Linux
Download LAMPP from here, at XAMPP for Linux section :
https://www.apachefriends.org/download.html
This page only shows you the three most recent versions of PHP. If you need older versions, it’s here:
https://sourceforge.net/projects/xampp/files/XAMPP%20Linux/
I suppose that I downloaded LAMPP to my downloads folder, at path: /home/jackie/Downloads/xampp-linux-x64-7.4.20-0-installer.run. I need to add execution permission for this file before I can execute this file. And because the installer can only run with root privilege, so I need to use sudo command also:
chmod +x /home/jackie/Downloads/xampp-linux-x64-7.4.20-0-installer.run
sudo /home/jackie/Downloads/xampp-linux-x64-7.4.20-0-installer.run
The LAMPP Installer will open a dialog as below. Click Next several times to start to install.

Finally, I have a LAMPP folder like this:

Let’s run LAMPP for the first time to make sure it works before I can move forward.
sudo /opt/lampp/manager-linux-x64.run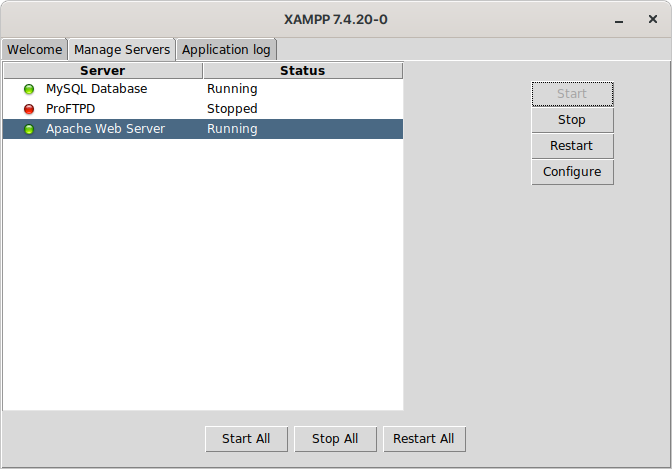
I just started MySQL and Apache. Now let’s access http://localhost in the browser. If you see the welcome page of XAMPP, then congratulation to you. It was installed successfully.

General Information
- Apache / Port: 80
- Documents root:
/opt/lampp/htdocs.
- Running with the daemon/daemon user group.
- Documents root:
- MySQL / Port: 3306
- Data path:
/opt/lampp/var/mysql. - The user is root with an empty password.
- Data path:
- ProFTPD / Port: 21
- Documents root:
/opt/lampp/htdocs. - The user is daemon with password is xampp.
- Documents root:
- Only one PHP version that you choose when download.
- phpinfo: http://localhost/dashboard/phpinfo.php.
- phpMyAdmin: http://localhost/phpmyadmin.
Always remember:
- DO NOT recursively change owner/change permission for the
/opt/lamppfolder. - Disable SELinux if your website document is put outside
/opt/lampp/htdocsfolder.
Apache Config
By default, LAMPP will serve content in /opt/lampp/htdocs for anyone who accesses port 80, there’s no any Virtual Host. If you want to access your projects by a custom domain like http://my-project.local, you must setup Virtual Hosts.
Because of the permission difference between /opt/lampp folder and the logged-in user permission, so I think it’s better to put all projects inside /home/jackie/Projects folder. I also want to keep Virtual Host configuration files between OS installation times. So, I will put Virtual Host configuration files inside /home/jackie/Lampp folder (for easy to backup purposes).
I will have a folder structure like this:
/
├── home
│   └── jackie
│       ├── Lampp
│       │   ├── 000-localhost.conf
│       │   └── my-project.local.conf
│       └── Projects
│           └── my-project.local
└── opt
    └── lampp
This structure is only my personal suggestion. You can use any structure that you feel better. I will use the domain name for the configuration file name, so I can easy to know which domain is available.
Because Apache is run with daemon user group, I need to add daemon user to my user’s group (my group name is jackie). So, daemon user can access files inside my home directory.
sudo usermod -a -G jackie daemonOn the contrary, I also need to have the ability to modify all files created by the daemon user (files created by PHP scripts, Apache…). So, I also add my user to the daemon group.
sudo usermod -a -G daemon jackieIn some Linux systems (mine is also included), by default, the new files always have permission 744 (user:rwx/group:r--/global:r--) when created. Thus, I need to change this default behavior by reconfiguring the PAM. I open the file /etc/pam.d/systemd-user with root privilege and append those lines at the end:
# Custom LAMPP Config
session  optional pam_umask.so usergroups
This file will look like this:

I need to reboot now to make the new configuration to be applied. After reboot, the umask value must be 0002. To double-check this, I open the terminal and type:
umask
To avoid permission denied error, I also need to change permission for my home root folder (/home/jackie) to allow my group’s users (included daemon user) access.
chmod 775 /home/jackieNow, I will configure Apache to automatically load configuration files inside /home/jackie/Lampp folder. Open file /opt/lampp/etc/httpd.conf (with root privilege to modify this file) and append those lines to the bottom of this file:
# Custom LAMPP Config
IncludeOptional /home/jackie/Lampp/*.conf
Create default Virtual Host
By default, LAMPP’s Apache doesn’t have any Virtual Host, it only serves content from document root (/opt/lampp/htdocs) folder. But if there’re some Virtual Hosts existed, when I access http://localhost address, it will serve content from the first Virtual Host.
I will create a Virtual Host for the localhost domain that will be loaded first, before any others configuration files. So, I create a configuration file /home/jackie/Lampp/000-localhost.conf with the content as below:
<VirtualHost *:80>
    DocumentRoot "/opt/lampp/htdocs"
    ServerName localhost

    <Directory "/opt/lampp/htdocs">
        Options -Indexes +FollowSymLinks
        AllowOverride All
        Require all granted
    </Directory>
</VirtualHost>
Create a new Virtual Host
When I have a new project, I will create a new Virtual Host and create a new custom domain for it. I will show you how to do this step-by-step:
To create a new custom domain, open the file /etc/hosts with root privilege and append a new line like this:
127.0.0.1 my-project.localThis project will be stored inside /home/jackie/Projects/my-project.local, so I open File Manager and create this folder first. Then create a new Virtual Host file /home/jackie/Lampp/my-project.local.conf with this content:
<VirtualHost *:80>
    DocumentRoot "/home/jackie/Projects/my-project.local"
    ServerName my-project.local

    <Directory "/home/jackie/Projects/my-project.local">
        Options -Indexes +FollowSymLinks
        AllowOverride All
        Require all granted
    </Directory>
</VirtualHost>
Finally, I open XAMPP Manager and restart Apache. Okay, now I can access my project at the address http://my-project.local.